Plans and Instructions
The original Denny Dart had a very simple swept-back wing with V-dihedral. I thought it was a sharp looking plane and it flew well for me both indoors and outside. Best indoor flight for me under 22' ceiling was 53 seconds. In my opinion the big improvement over the Delta Dart was that the wing was adjustable. Another feature was that the left wing was longer than the right panel, for extra lift when flying circles to the left.
Bill Kuhl
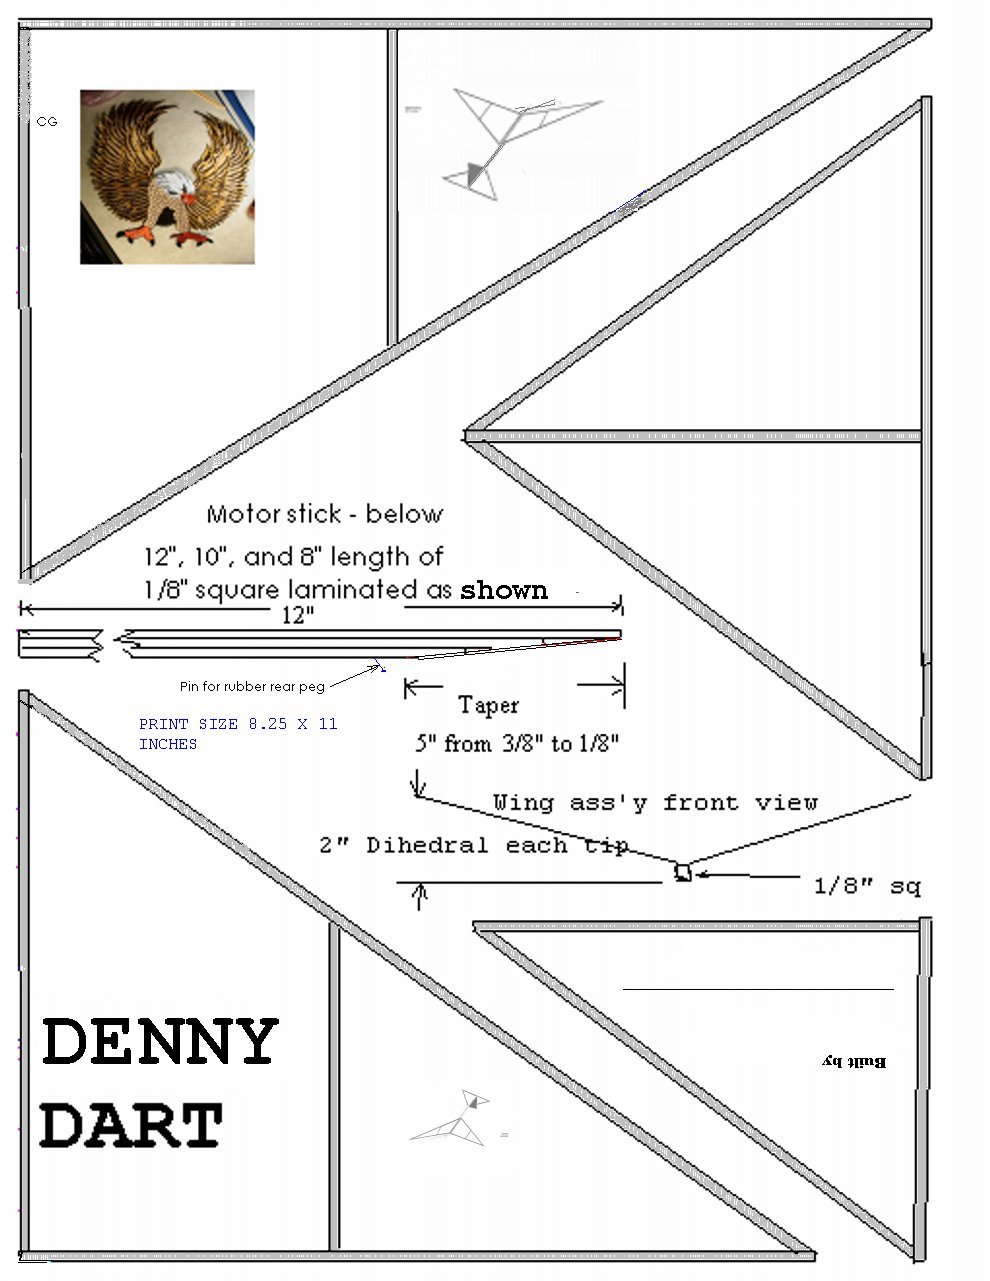
Denny Dart Instructions - by Neil Dennis (wombat)
Tools required
Razor blade (single edge) or model knife
Several straight pins
Wood glue ( Titebond or Elmers recommended)
A glue stick is also recommended to assemble sticks to paper
A flat surface to work on that can have pins put in
(A ceiling tile, piece of insulation board or cardboard)
A small piece of fine sandpaper
Materials required
1/8” square by 36” balsa strip (1)
1/16” x 1/8” by 36” balsa strip (3)
Plastic propeller (7”) and plastic mounting bushing
8” to 10” loop of 1’8” rubber motor (band)
2 very small rubber bands (orthodontic)
Copy of plan layout printed on light weight paper or tissue paper
Place the plan sheet on the
building board so that the lettering is on the under side,
this is so that when the wings are assembled on the model, the paper
covering will be on the top side and read correctly.
It also makes sure that the right wing and left wing are correctly placed
on the model (they are different)
Carefully lay out and cut the 1/16” x 1/8” sticks so they will fit
between the lines on the edges of the wing and tail outlines.
I would cut all the sticks to fit first, then glue them in place.
Starting with the longest sticks on the wing, lay a stick on a flat
surface, carefully wipe the glue stick from the middle outward each way on the
side that will be glued to the paper, then put it in place and smooth it down
with your fingertip. If you don’t
have a glue stick, carefully wipe a very thin layer of glue on the stick with
your fingertip. The best way I’ve
found to make the stick to stick glue joints is to put several drops of the wood
glue on an old plastic bottle top, then dip the end of the stick that is to be
glued into the puddle Carefully
place the glued end against the other stick - do not leave any gaps.
After all sticks are
glued in place. let things set up (dry) for a bit, then using the razor blade
very carefully, cut around the outside of each part of the wings and tail to
free them from the plan.
To build the body, cut
one each 12”, 10” and 8” piece from the 1/8” square stick.
The leftover 6” will be used to mount the wings later.
Wipe a light coat of wood glue on one side of the 10” strip and
assemble it to the 12” piece being carefull to keep one end even, smooth the
two together so they make good contact all the way.
Do the same thing with the 8” stick.
Let this assembly dry thoroughly. Cut
the taper on this stick as shown on the plan from starting at 5” from the end
to the lower edge of the 1/8” square stick at the end, be careful to keep the
cut square, at 90 degrees from the side of the glued up motor stick. This taper (angle) is very important to the models flying
ability, it causes the stabilizer (tail) to be a negative angle to the wing
(this is called “decalage” and
is needed to make the model stable in flight.
To assemble the wing, pin the 6” piece of 1/8” sq you
saved to the board only at the very ends. Put
a small bead of glue down the center of the stick, then carefully center the two
wing panels inner edges on it. Using
something that is about 2” tall under each wing tip (I use 35mm film
containers) prop the tips up making sure that the inner edges are centered on
the 1/8” piece and down tight to it. Let
this joint dry. Remove the pins,
take up the wing assembly and carefully sand a taper on each end of the 1/8”
square so that the end comes to a sharp point.
To assemble the tail, put
the stabilizer paper down (sticks up) on the board, put some glue on the middle
strip and carefully put the tapered part of the motor stick down making sure
that it contacts both front and rear of stab.
Use something square, like a small clamp to hold the motor stick at 90
degrees to the stab and at the correct angle (the nose end will be up off the
table about 1/2” , that will make the stab come out in the right position when
the glue dries, then glue the rudder to the top of the stick, making sure
that it is square and straight.
Carefully sand the front
of the motor stick until it is a snug fit inside the plastic propeller bearing,
push a straight pin into the bottom of the motor stick just in front of the
stabilizer (rear motor hook). Put a
drop of glue around this pin to strengthen the balsa, you may want to put a few
wraps of thread around the stick there also
Assemble the propeller, hook motor between hooks and find balance point
by resting stick on side of pencil and moving it back and forth until you find
where it stays level. Mark an
“x” on the motor stick at this point..
To assemble the model, take off the propeller assembly, put the two
small rubber bands on the stick, one just ahead of the rear peg, one just behind the propeller bushing.
Place the wing assembly, the 1/8” sq flat on the top of the motor stick
with the “cg” letters in line with the “x” and slide the bands
over the ends of the stick to hold the wing in place.
Hook up the rubber band,
lubricate it first with a little baby oil or silicon lube, the model is ready to
fly. Wind the propeller (clockwise
from front) about 50 turns, hold
the model at shoulder height and level, let go of prop and give a gentle push as
you let go. The model should fly in
a slight right turn and at a smooth angle.
If it swoops up and then drops, move the wing back a little (only about
1/8”), if it dives down move the wing forward the same amount.
When it is flying smooth and level, keep increasing the turns wound in,
you should be able to get up to 300 - 400 safely without breaking the
rubber
Shortly after completing my first Denny Dart, Neil informed me that he had re-designed the wing, this was the Denny Dart Mark II. I quickly constructed the new wing which had a straight rectangular center section and swept back tips. This arrangement did not put the stress on a glue joint in the center of the wing. Neil's biggest complaint of the Delta Dart was that the wing was weak at the center where the wing halves meet the motor stick.
Bill Kuhl
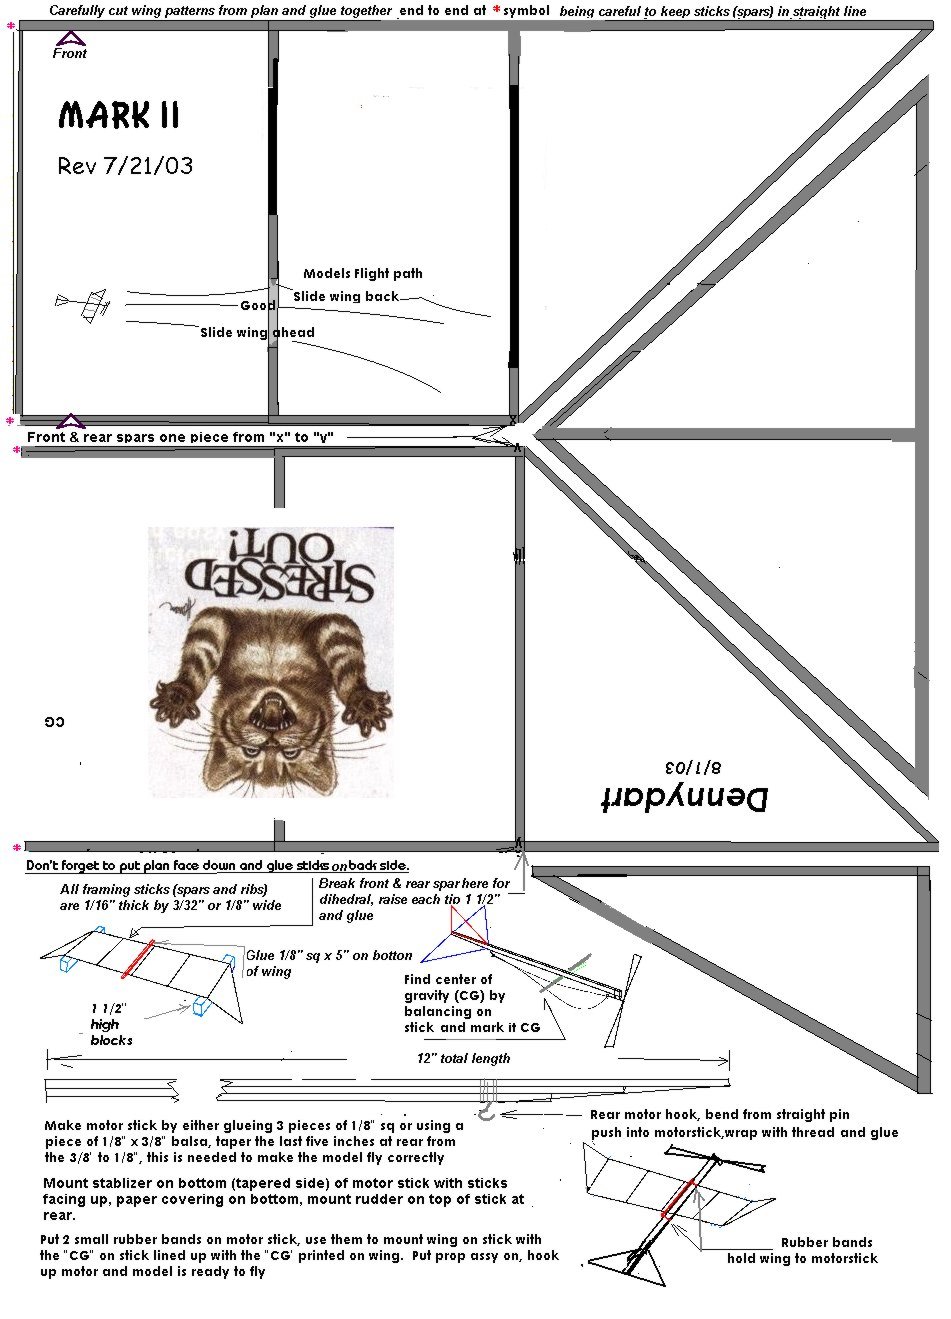
Denny Dart Mark II Instructions
Carefully
cut the two parts of the wing plan from the sheet, trim off the excess at the
wing center, leave about 1/4 inch overlap and glue together being careful to
keep the front and back spar (stick) lines straight in line.
Place the plan sheet, both for the wings and also for the fin and
stablilzer on the building board so that the lettering is on the under side.
Carefully lay out and cut the 1/16 x 1/8 sticks so they will fit between
the lines on the edges of the wing and tail outlines.
Starting with the longest sticks on the
wing, lay a stick on a flat surface, carefully wipe the glue stick from
the middle outward each way on the side that will be glued to the paper, then
put it in place and smooth it down with your fingertip.
If you don’t have a glue stick, carefully wipe a very thin layer of
glue on the stick with your fingertip. The
best way I’ve found to make the stick to stick glue joints is to put several
drops of the wood glue on an old plastic bottle top, then dip the end of the
stick that is to be glued into the puddle Carefully
place the glued end against the other stick - do not leave any gaps. NOTE: do
not glue the dihedral break points (marked x & y) at this time.
After all sticks are glued in place. let things set up (dry)
for a bit, then using the razor blade very carefully, cut around the outside of
each part of the wings and tail to free them from the plan.
To build the motorstick, cut one each 12,10 1/2 and 9 in. piece from the 1/8 sq stick. The leftover 5 in. will be used to mount the wings later. Wipe a light coat of wood glue on one side of the 10 strip and assemble it to the 12 inch piece being careful to keep one end even, smooth the two together so they make good contact all the way. Do the same thing with the 8 in. stick. Let this assembly dry thoroughly. Cut the taper on this stick as shown on the plan starting at 5 in. from the end to the lower edge of the 1/8 sq stick at the end, be careful to keep the cut square, at 90 degrees from the side of the glued up motor stick. This taper (angle) is very important to the models flying ability, it causes the stabilizer (tail) to be a negative angle to the wing (this is called decalage and is needed to make the model stable in flight.
To assemble the wing
line up each of the "x &
y" joints, prop up each wing tip 1 1/2 inches,
and carefully glue these 4 joints - Let this joint dry. Pin the 5 in.
piece of 1/8 sq only at the very ends. Put a drop of glue on the under side of
the wing spars at the arrowhead marks and place the wing carefully lining up
these marks on the top of the 1/8 square pc.
When dry remove the pins, take up the wing assembly and carefully sand a
taper on each end of the 1/8 square so that it comes to a sharp point.
To assemble the tail, put the stabilizer paper down (sticks
up) on the board, put some glue on the middle strip and carefully put the
tapered part of the motor stick down making sure that it contacts both front and
rear of stab. Use something square,
like a small clamp to hold the motor stick at 90 degrees to the stab and at the
correct angle (the nose end will be up off the table about 1/2 in, then glue the
rudder to the top of the stick, making sure that it is square and straight.
Carefully sand the front of the motor stick until it is a
snug fit inside the plastic propeller bearing, push a straight pin into the
bottom of the motor stick just in front of the stabilizer (rear motor hook).
Put a drop of glue around this pin to strengthen the balsa, you may want
to put a few wraps of thread around the stick there also. Assemble the
propeller, hook motor between hooks and find balance point by resting stick on
side of pencil and moving it back and forth until you find where it stays level.
Mark an x on the motor stick at this point..
To assemble the
model, take off the propeller ass’y, put the two small rubber bands on the
stick, one just ahead of the rear peg, one just behind the propeller bushing. I
recommend that each band be put on with a double loop, this will hold the wing
more solidly. Place the wing
mounting stick ( 1/8 sq) flat on the top of the motor stick
with the cg letters in line with the x and slide the bands over the ends
of the stick to hold the wing in place. Looking from the front, the wing and
stabilizer should be parallel, if not, carefully sand the bottom of the wing
mounting stick until they are.
Hook up the rubber band, lubricate it first with a little
baby oil or silicon lube, the model is ready to fly.
Wind the propeller (clockwise from front) about 50 turns, hold the model at shoulder height and level,
let go of prop and give a gentle push as you let go. The model should fly in a slight right turn and at a smooth
angle. If it swoops up and then
drops, move the wing back a little (only about 1/8), if it dives down move the
wing forward the same amount. When
it is flying smooth and level, keep increasing the turns wound in,
you should be able to get up to 800 safely without breaking the rubber.
By removing the plastic nose piece from the stick and stretching the rubber to
about 3 times its normal length as it is wound, you can put in more turns
safely.
As you put in
more turns, if the model stands on its tail at first, carefully twist the
plastic bushing so the propeller points slightly to the right, this will make
the model climb in a right hand spiral. If
the circle is too large, put a tiny bit of clay on the right wing tip.
If you do this you will have to move the wing forward a little to correct
for the extra turn causing the model to nose down.
Enjoy your model, if you want to build bigger and better
models, many kits are available, but take a word of advice, do not try to build
a scale model of a real airplane for your second try.
Look for a beginners stick and tissue design.
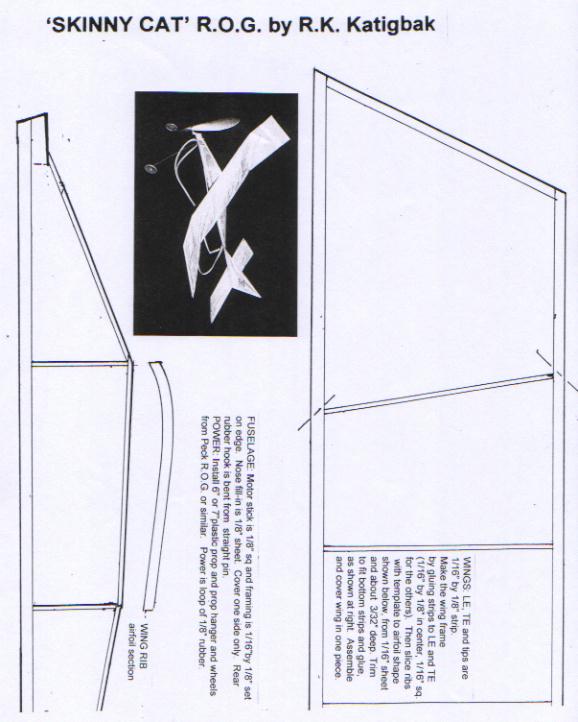
Skinny Cat
Jun from Manila sent me several designs for the contest, but the one I chose to build was the Skinny Cat. The Skinny Cat has the look of the popular "Pussycat" designs, in a configuration much like a no-cal plane. Instructions for the Skinny Cat are on the plan.
This is the description of the Skinny Cat that Jun had sent:
The “Skinny Cat”
features probably the easiest and neatest way for a first-timer to make a
cambered wing, and is also a first step toward learning to make a built-up
fuselage.
The wing starts
out from Dick Baxter’s well-proven “Pussycat” planform (which is why
it’s called a “Cat”), but introduces some new wrinkles in the building. The wing planform is first built from flat strips, and then
sliced ribs are glued on to the strips. This
is much less fiddly than using sliced ribs alone, and much
stronger. Also, the dihedral is installed indoor-model style.
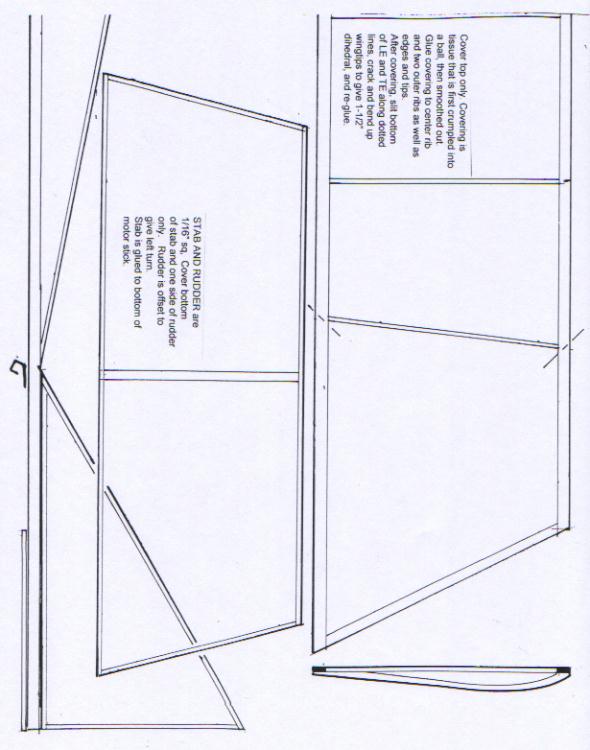
The wing is framed and covered flat in one piece.
Then the LE and TE are slit partway through at the bottom, cracked and
bent up to the required dihedral angle, and re-glued.
The fuselage is
built “no-cal” style but the motor stick is at the bottom of the fuselage
profile rather than at one side. Thus
the profile is not just ornamental but also functional.
It provides strength and stiffness, acting much like the bracing of an
indoor model’s motor stick. The
tissue covering on one side of the fuselage profile is a sort of introduction to
covering a built-up fuselage, and also adds some stiffness.
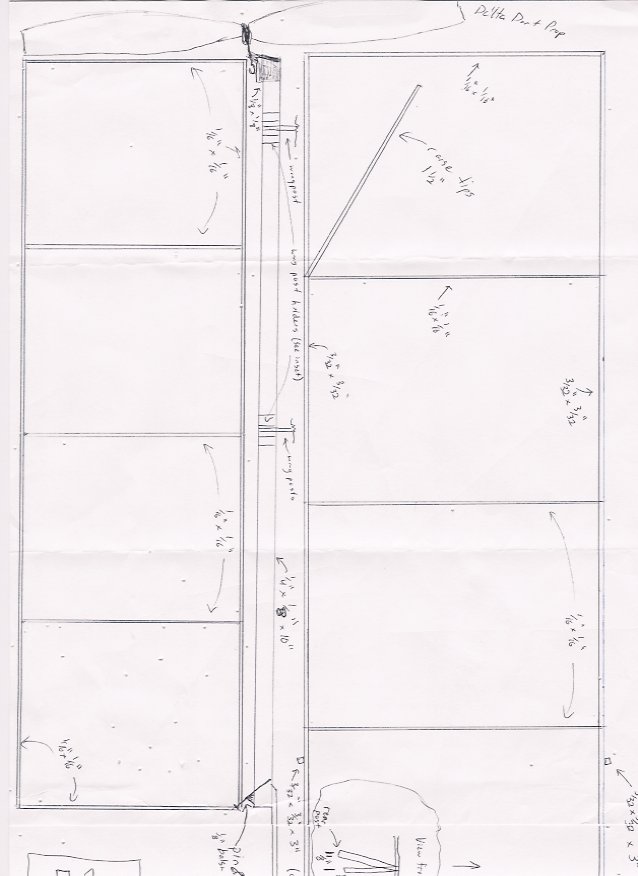
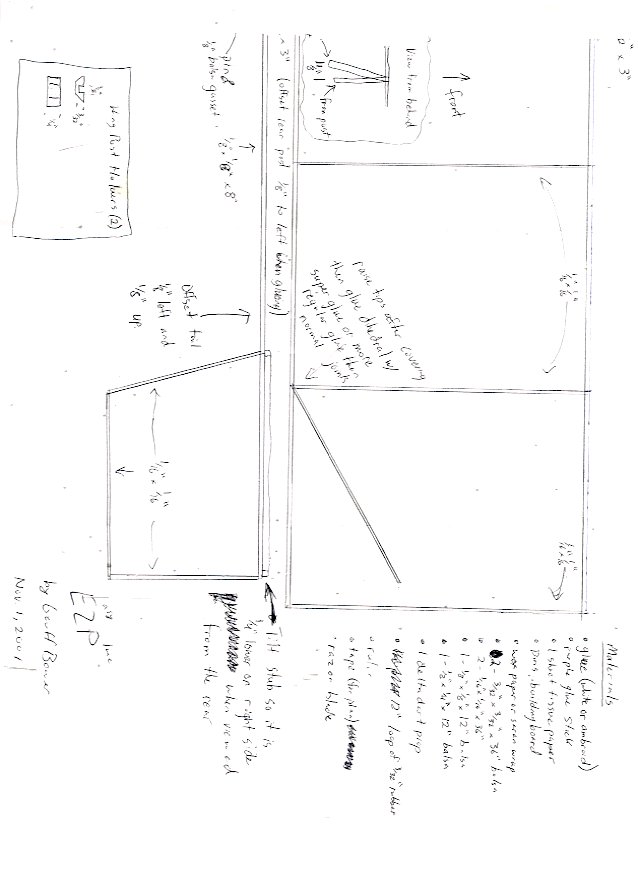
Easy Plane (EZP)
Beginner Free Flight Model
Designed
by Geoff Bower
When
I set out to design a beginner plane, I tried to keep a few things in mind.
First, it had to use low cost, easy to obtain building materials. Second, it has
to involve building techniques and features common to more advanced designs but
still remain simple and understandable. Lastly, it has to exhibit respectable
flying qualities both indoors and outdoors. Overall, I feel the EZP fulfills
these requirements leading to a very appropriate beginner free flight model.
As
noted on the plan the EZP requires very few building materials. I constructed it
using only about $1 worth of balsa wood in the form of; 2- 3/32" square by
36", 2- 1/16" square by 36", 1- 1/8" square by 12", and
1- 1/8" by 114" by 12". Other supplies that would likely come in
a kit include; a delta dart plastic propeller, a 12" loop of 3/32"
rubber, and one sheet of tissue paper. The only supplies that need to be
supplied by the builder would be a piece of cardboard for a building board, some
tape, wax paper or saran wrap to protect the plan during construction, a ruler,
a razor blade, pins, a glue stick, and glue. No special building materials are
needed such as templates, multiple glues, or lightweight custom sized balsa.
These limited materials were chosen to keep the building time and complexity
down.
This
plane incorporates many designs and building techniques found when constructing
more advanced planes such as Pennyplanes or EZBs. The addition of wing washin by
angling the rear wing post to the left during construction along with offsetting
the wing to the left introduces the builder to a couple common practices. The
use of tip dihedral is also incorporated into the design as it is used in almost
all indoor models. Stab tilt and
boom/rudder offset are also common features included in the EZP that are used to
help maintain turn in more advanced models. In keeping with the theme of a
beginner design also omitted some of the more time consuming aspects of more
advanced construction. A flat airfoil was used to simplify construction. Rather
than using tissue tubes I decided to use shaped balsa to hold the wing posts in
place. These are much easier and quicker to build. I eliminated the need for
wire and pliers by using a straight pin inserted into the motor stick a an angle
to hold the rubber. Also, I decided not to fool around with the thrust angle to
help with turn or pitching. The downthrust angle built into the plastic delta
dart prop assembly is used. By including many features common to more advanced
models I feel this does a much better job of introducing people to techniques
used in the hobby. In addition, the omission of difficult to build,
time-consuming features were to keep the complexity and time to build within the
hour time limit.
To
be a successful beginner model a plane must show decent flying qualities to
develop interest and confidence in the builder. The EZP does this by flying in a
consistent 30ft or so diameter circle indoors and by maintaining stability and a
nice circle in a gentle breeze outdoors. In its first flight out of the box, the
EZP flew for 55 sec indoors and to a height of about 30ft. The best time
achieved with a 12" loop of 3/32" rubber was a little over a 1 minute.
From the time that I first taped the plan to my building board to the time the
last component was attached was 55 minutes. Another quality is that the
performance of the EZP has the potential to increase as the builder progresses.
Modifications can easily be made to the design such as the addition of a curved
airfoil, tissue tubes, a shaved and/or increased diameter propeller, and longer
thinner rubber With all these modifications, times should push 2 minutes.
The EZP makes for a great beginner model due to its simple: construction, many features, good flying qualities, and flexibility. Construction time is held under an hour by the use of common easy to use materials, and simple construction techniques. Many features common to more advanced planes are incorporated into the design without drastically increasing build time. The plane maintains a stable flight pattern over 1 minute and with a few more time consuming features could fly for around 2 minutes.
Air Hare Plans